Scientific Visualization Artist Tools
-
News
-
Overview
-
Components
-
Examples
-
Download
-
Installation
-
Future Work
-
Acknowledgements
-
References
|
2008-04-08
|
Released v0.4.0 with the new tools vtkdump.py (textual dump of VTK files), pygribs.py (python generated rib scenes), png2spk.py (reverse engineer colorbars), and ncregrid3d (2D and 3D curvilinear-to-uniform grid interpolators).
Added new RenderMan shader RSZatmos.sl for an artistic, volumetric planet atmosphere (very pretty).
Small updates to xvtk.py (quick previewer of VTK files) to colorize texture coords, apply a texture, and scale spatial coordinates.
Added LightToRIB.py to convert a Blender light into a RIB light.
|
|
2007-10-09
|
Released v0.3.0 with the new tools mpir and seqck.py.
|
|
2006-09-01
|
Project hosted by SourceForge.
|
The SciVis Artist Tools (SVAT) is a collection of scripts, shaders and converters that will empower you to:
- convert data and color transfer functions from the Visualization Toolkit (VTK) for RenderMan® compliant renderers, i.e. 3Delight and Aqsis
- export objects from Blender, such as cameras and meshes to RenderMan
- re-use or build upon some custom RenderMan shaders
- re-use or learn by example on how to use various computer graphics techniques not possible solely with OpenGL
Yeah, but... aren't there already VTK-to-RenderMan and Blender-to-RenderMan converters? Absolutely, but could you show me published results that they meet all your needs? They didn't for me, and so here we are. For example, VTK ships a vtkRIBExporter class, but it poses the problem of exporting an entire scene in one go, in ASCII and without line support, and how often can you get away nowadays with visualizing complex scenes in a single render pass?
These tools are for you if:
-
You want to do high-end sci-vis in 3D, for free!
-
You want to learn exactly what RenderMan does in practice, and how to make it work for you.
-
You're familiar with programming with C++ and Python (you'll have to compile, install and write moderate code to "glue" your workflow together).
-
Your other renderers can't create shadows, transparent image channels, anti-alias, scale with large data or render without obvious artifacts (like incorrect zbuffer sorting).
-
You don't have expensive [graphics] hardware.
These tools aren't for you if:
-
You expect to create realtime, interactive visualizations.
-
Programming and scripting intimidate you.
-
You can't configure your environment to install and re-use many existing [open-source] libraries and tools.
Any ideas for a feature? Submit it here. Uncovered a bug? Submit a ticket here.
Here's a quick break down of what each piece of the SVAT bundle does.
3.1 vtk2rib
3.2 Colormaps and Conversion
3.3 Shaders
3.4 Blender Tools
3.5 Miscellaneous Utilities
3.1 vtk2rib
It does what it's called, convert Visualization Toolkit (VTK) datasets into RenderMan Interface Bytestream (RIB). For input, it supports vtkPolyData, vtkUnstructuredGrid, and vtkPointSet with different flavors of RIB output, such as
-
vtkPolyData to polygon mesh(es), or lines
-
vtkUnstructuredGrid with hexahedron cells
-
vtkPointSet to either RenderMan points, or spheres, or whatever (this can be generalized to easily duplicate arbitrary objects)
Texture coordinates, scalars and normals also go along for the ride where applicable.
3.1.1 vtk2rib Example 1
Here's what you can do in a Python script to export a vtkPolyData mesh with its scalars, texture coordinates and normals into a binary RIB file, just supply your own "CreatePolyData" function.
import vtk
import vtk2rib
vtk2rib.cvar.outputScalar = True
vtk2rib.cvar.outputNormals = True
vtk2rib.cvar.outputTCoords = True
vtk2rib.cvar.outputAscii = False
vtk2rib.cvar.outputFilename = 'ex1.rib'
vtk2rib.vtkPolyDataToRIB(CreatePolyData().__this__)
3.1.2 vtk2rib Example 2
Here's a variant that exports a point cloud as spheres using the same radius (although they can be scaled by scalars by using vtk2rib.cvar.outputScalarAsSphereRadius).xs
import vtk
import vtk2rib
vtk2rib.cvar.outputSphereRadiusScale = .1
vtk2rib.vtkPointSetToRIBSpheres(CreatePointSetData().__this__)
3.2 Colormaps and Conversion
Other than geometry, the second most important aspect to Sci-Vis is probably mapping colors to your data, and we have many ways to do that to ultimately render them with RenderMan. First you'll need to define a colormap and then create a RenderMan shader that can use it. There are three such ways.
3.2.1 Uniform Colormap
This is the simplest approach which assigns a series of colors across an evenly spaced scalar range. This minimizes the number of changes needed to get something working, but may not work well when your data histogram is much more clustered or logarithmic. You can generate a simple shader with this command:
m4 -DNUMCOLORS=6 RSZUniformLUTRGBA.sl > uniformlut6.sl
And then specify the scalar limits and colors in your scene's RIB file:
Surface "uniformlut6"
"float smin" [0.0]
"float smax" [1.0]
"uniform color rgb[6]" [ 0 0 0  1. 0. 0.  .7 1. 0.  0. 1. 0.7  0. 0. 1.  0 0 0]
"uniform color a[6]" [ 0 0 0  0. 0. 0.  .3 .3 .3  .6 .6 .6  1 1 1  0 0 0]
3.2.2 vtkLookupTable
You can also choose to use a linear colormap defined by a vtkLookupTable. So in a Python script, use these commands to generate a snippet of RIB that resembles what you saw in section 3.2.1, excluding the shader's name because we implemented many shaders that support colormaps.
from vtkLookupTableToRIB import vtkLookupTableToRIB
# Define your lut instance...
# Now print the RIB code.
print vtkLookupTableToRIB(lut, n=6)
3.2.3 ASCII Colormap
Converting the color, opacity, and relative scalar range from a simple text file can be quite powerful because the colormapping doesn't need to be uniform. Here's how to use a script to generate a 256 color table
spk2rib.py ../colormaps/jet.spk -1 1 256
The color entries are simply described in ASCII by jet.spk with 5 columns (scalar percent, red, green, blue, opacity) so it's easy to make customizations:
0       0       0       50      100
12.5    0       0       100     100
37.5    0       100     100     100
62.5    100     100     0       100
87.5    100     0       0       100
100     50      0       0       100
Notice that the output doesn't have any endpoint spline padding as was the case for the previous 2 uniform colormap approaches. Put this output into your scene's RIB where you defined your shader that understands colormaps. You can create such a shader as described in the shader section.
3.2.4 Reverse Engineer Rasterized Colorbar to ASCII
If you come across a nice scientific visualization with a clever color mapping, why not re-use it? After cropping out the colorbar strip into a PNG image, you can apply this script to generate an ASCII file in the SPK format like shown above in Sections 3.2.x. However, it's your job to deal with any non-linear scalar mapping. This will only extract the color components.
./png2spk.py colorstrip.png > pirated.spk
3.3 Shaders
Here's a growing number of RenderMan shaders intended to let you break into REYES rendering with your Sci-Vis problems.
3.3.1 A Generic Colormap Material
You'll need to generate this material and include it in any of your colormap-aware shaders. The reason for this is because the RenderMan Shading Language (RSL) doesn't support dynamic arrays, so before compiling, you'll need statically allocated arrays for your color specification, and that depends on how many color entries you defined. Here's how to create the include file when using 6 colors:
m4 -DNUMCOLORS=6 RSZMaterialLUTRGBA.sl > RSZMaterialLUTRGBA6.sl
3.3.2 Colormapped Shaders
After creating the basic colormap material, you can create a shader using a plastic reflectance model:
m4 -DNUMCOLORS=6 RSZPlasticLUTRGBA.sl > lutplastic6.sl
The same can be done for similar colormap-aware shaders. These include:
-
RSZFresnelPlasticLUTRGBS.sl - This allows you to make your geometries opaque along glancing angles. This can be useful for nested isosurfaces.
-
RSZgcloudLUTRGBA.sl - This will employ the "Gardner Cloud" technique to shade objects, such as spheres, more transparent along the edges, somewhat the opposite of what the Fresnel shader does. This can be useful to fake volume rendering by having overlapping spheres at data points.
-
RSZgcloudLUTRGBAfBm.sl - The is a variation on the "Gardner Cloud" technique, but with the added feature of "fractional Brownian motion" noise. In other words, your objects, say spheres, will be mottled with turbulence that can resemble clouds. This can really spice-up your low-resolution data because of the noise's higher frequency detail, though low-frequency noise is possible as well to create a mistier look.
-
RSZMaskedPlastic.sl - If you ever wanted a cookie cutter that uses a 2D image to [smoothly or not] carve out your 3D object through projection, this is your shader. One application is to let a grayscale image define areas in your scene where you'd like 3D flying arrows to appear like ghosts, and then vanish when exiting these regions.
-
RSZTiledPlastic.sl - This basically shades your object with a solid color with a configurable grid line spacing and color. The advantage of that is that no texture is needed because the lines are generated procedurally, and second the lines can be rendered very crisply with sufficient sub-pixel sampling and filtering; textured images of gridlines always appeared to fuzzy for my taste.
3.3.3 Volumetric Shader
-
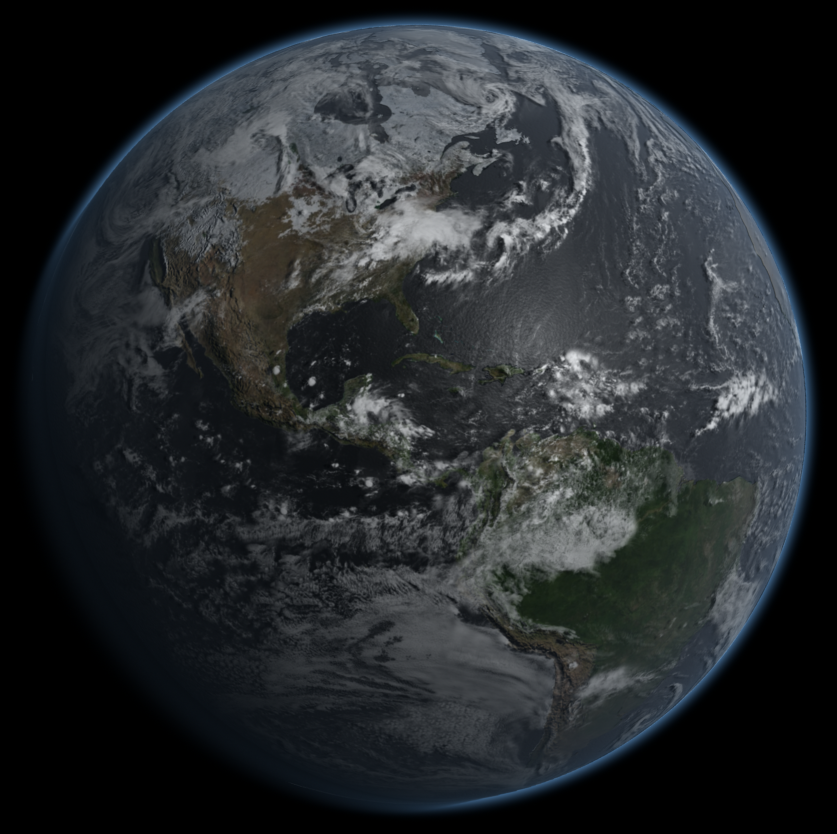
RSZatmos.sl - A generic atmosphere shader for spheres to create cliche halos. You can control the outer and inner radius, density and coloring as functions of radius.
Here's an example:

3.4 Blender Tools
Blender can be invaluable to create camera flyovers or to model and keyframe completely new 3D objects, which can help to embellish your Sci-Vis scenes. At the very least, Blender can be used as a previsualization tool when coupled with the VTKBlender module.
-
CameraToRIB.py - It does exactly that, it exports a camera or multiple cameras as ASCII RIB which you can simply include into your scene with ReadArchive.
-
MeshToRIB.py - This is handy when you model a new object in Blender, and would wish to export for RenderMan to fuse with your Sci-Vis scene.x
-
LightToRIB.py - Converts the various Blender lights (point, sun, spot) into a RIB compliant light.
3.5 Miscellaneous Utilities
Some programs crop up to fulfill exceptional needs outside the scope of the other tools. These can be in C/C++ for performance reasons, or to link with a particular API, or in a scripting language to just get the job done. Don't worry, there's a Makefile to compile where applicable.
-
mpir - This is a generic server/client MPI program to delegate independent tasks to many processors. This makes it easy to use graphics tools on MPI-centric hosts. See examples of its use are in Section 4, such as batch rendering or batch image post-processing.
-
nc2dtograytif.cxx - This will create a 16 or 32-bit TIFF image from a NetCDF file specifically for use as a displacement or bump map by RenderMan.
-
ncregrid3d(hex) - Interpolates from a static structured 3D grid in a Netcdf file to a uniform grid. You can do this with tetrahedra or hexadra. There's a 2D version that accepts VTK input files instead of Netcdf called cellptids and mapinterp. The idea is to create a regidding lookup "map" in the first pass with expensive KDTree searching, and then interpolate the data really fast with a second pass.
-
pygribs.py - Allows you to compactly manage and emit elaborate RIB scenes with the help of a Python scripting wrapper. Its greatest strengths are frame number interpolation for filenames (think of animated cameras, lights, RIBs in general), and inlined or referenced RIB Archives.
-
seqck.py - Sequence checker. If you batch rendered and need to see what frames are missing in case of a system crash or exhaustion of your compute quota, use this to get a listing of missing frame filenames. See an example of its use in Section 4.
-
vtkRenderWindowInteractorKeyBindings.py - This can be easily integrated with your VTK window interactor to get some default keyboard bindings, plus the benefit of creating your own. Existing bindings, for example can allow for camera movement, zoom, window resizing and window-to-image dumps.
-
vtkdump.py - Dumps scalar, point, and cell data to STDOUT for VTK files. You can specify which arrays, components and index ranges to help debug your datasets.
-
xvtk.py - This will allow you to preview a series of VTK files. The files can be grouped at the command-line (CLI), so you can actually animate a series of files with multiple objects per frame. There are numerous CLI options to specify colormaps, scalar ranges, glyphs, orientation markers, object scaling, data striding and image export.
Aside from the unit tests that ship with SVAT, you can see firsthand how some scenes were created. Observe how the input files are related and what its like to render it yourself.
4.1 Example 1: Displaced Surface
This scene is so simple, it can be thought of as a "Hello World" of displacement mapping. We just apply an image texture for colors and a grayscale image to displace the square plane. The Blender file allows us to graphically place the camera and export it.

|
After downloading the
demo1.tar.gz
, run these commands to render it with 3Delight. Be sure that the renderer can find the RSZsupertexmap shader file.
tdlmake texture.jpg texture-mipmap.tif
tdlmake displacemap.tif displacemap-mipmap.tif
renderdl -d demo1.rib
|
4.2 Example 2: Colormapped Data
Here we'll build upon a displaced spherical surface with colormapped data from a simulation with a small embellishment of coastlines. Animations of this graphic may be found at GFDL's Visualization Gallery.

|
After downloading
demo2.tar.gz and demo2-coastline.tar.gz
, run these commands to render it with 3Delight:
# Create shader with SVAT distribution.
m4 -DNUMCOLORS=5 RSZMaterialLUTRGBA.sl > RSZMaterialLUTRGBA5.sl
m4 -DNUMCOLORS=5 RSZPlasticLUTRGBA.sl > RSZPlasticLUTRGBA5.sl
shaderdl --dso -O3 RSZPlasticLUTRGBA5.sl

tdlmake displacemap.tif displacemap-mipmap.tif
renderdl -d demo2.rib
|
4.3 Example 3: Colormapped Data with Particle Texturing
We'll combine colormapped data with textured particles to create a cloud effect, plus our background will use a procedural tile pattern and 3D objects modeled in Blender. Animations of this graphic may be found at GFDL's IPCC Models and Hurricanes research webpage.

|
After downloading
demo3.tar.gz
, run these commands to render it with 3Delight:
# Create shaders with SVAT distribution.
m4 -DNUMCOLORS=6 RSZMaterialLUTRGBA.sl > RSZMaterialLUTRGBA6.sl
m4 -DNUMCOLORS=6 RSZgcloudLUTRGBAfBm.sl > RSZgcloudLUTRGBAfBm6.sl
shaderdl -I/usr/local/renderman/arman/shaders --dso -O3 RSZgcloudLUTRGBAfBm6.sl

m4 -DNUMCOLORS=8 RSZMaterialLUTRGBA.sl > RSZMaterialLUTRGBA8.sl
m4 -DNUMCOLORS=8 RSZPlasticLUTRGBA.sl > RSZPlasticLUTRGBA8.sl
shaderdl --dso -O3 RSZPlasticLUTRGBA8.sl

shaderdl -I/usr/local/renderman/arman/shaders --dso -O3 RSZTiledPlastic.sl

# The arrow mask was used to make animated arrows fade into the scene.
tdlmake arrowmask.tif arrowmask-mipmap.tif
tdlmake land.tif land-mipmap.tif
tdlmake landdisp.tif landdisp-mipmap.tif

# Render the deep shadow map. The input RIB is the same as demo3.rib, but with some lines commented so only the particles create shadows.
renderdl -progress demo3dsm.rib
# Now render the scene's background elements with the shadow map included.
renderdl -d demo3.rib
# Now comment out the grid, land and data objects and render the clouds and arrows.
renderdl -d demo3.rib
# Now you can composite the results.
composite demo3fore.tif demo3back.tif demo3.tif
|
4.4 Example 4: Batch Rendering on an MPI System
The first example renders 2,000 frames with Blender on a 512 CPU computer. Notice how mpir uses a command-line template. You specify a frame range length with the '-g' option. Progress is echoed as a table.
# Start the multi-cpu rendering.
mpirun -np $NSLOTS mpir -S 15 -s 1 -e 2000 -g 15 'blender -b scene.blend -o /tmp/ -F PNG -x 1 -t 1 -s %start -e %end -a'

# Status is echoed every 15 seconds using the '-S' option.
-----------------------------------------------
Task |  PE  | Start | End   | Time  | Time Avg
000  | 0001 | 0001  | 0015  |       |
001  | 0002 | 0016  | 0030  |       |
...
------------------------------------------------------
Elapsed  | Computed |   Min    |   Avg    |   Max    | Progress
00:02:02 | 00:00:00 | 00:00:00 | 00:00:00 | 00:00:00 | 0/2000 (0%)
This will also render frames, but only those specified in a text file which can be generated manually or by seqck.py.
echo 1 15 22 25 > frames.txt
mpirun -np $NSLOTS mpir -S 15 -i frames.txt 'blender -b scene.blend -o /tmp/ -F PNG -x 1 -t 1 -s %start -e %end -a'
Here we use mpir to do image cropping and rolling with ImageMagick. For string interpolation of %start, we specify the %d format using the familiar C-printf syntax.
mpirun -np $NSLOTS mpir -S 30 -s 1 -e 2000 -g 1 -f '%d' 'f=`printf %04d.png %start`; convert \( /tmp/$f -crop 3999x1998+1+1 \) -roll +2000+0 +repage /tmp2/$f'
4.5 Example 5: Checking for Missing Animation Frame Files
In the event that your batch rendering didn't complete, you can check your list of files produced to find what's missing. seqck.py will scan your filenames to see if any name is missing from a sequence. For example, if frames 1850 and 1900 are missing from a rendering of 2,000 frames, here's what we'd get:
seqck.py -s 1 -e 2000 -i '/tmp/%04d.png' -o '%04d'
1850
1900
Project Tree: svat-0.4.0.tar.gz
-
There are prerequisites, but some are optional.
-
VTK - Visualization Toolkit for data processing and geometry creation. This is only needed for VTK-aware tools like vtk2rib. Tested with VTK 5.1.
-
NetCDF - (Optional) This is the predominate binary data file format used in scientific codes at GFDL and is usually the format before conversion by VTK. Tested with NetCDF 3.5.1-3.6.1.
-
Python - (Optional) Some executable scripts are in Python. Tested with Python 2.3.4.
-
3Delight - The RenderMan renderer. A potential substitute could be Aqsis. Test with 3Delight 6.1.
-
Blender - The 3D GUI environment for modelling, previsualization and Python scripting. Tested with Blender 2.43.
-
VTKBlender - (Optional) A Python script for converting between VTK and Blender.
-
SWIG - (Optional) A Python interface generator for our C++ codes, such as vtk2rib. Tested with SWIG 1.3.27.
GCC - GNU Compiler Collection which has a free C++ compiler for creating some of our tools, such as vtk2rib. Tested with GCC 4.0.3.
-
-
Download and untar the project tree.
tar xvzf svat-*.tar.gz
-
Change into the top SVAT directory and modify the file Makefile.inc. You'll have set the variables ROOT and PREFIX. If you choose to use 3Delight as your RenderMan renderer, also set DELIGHT.
Change into the src/ directory, edit the Makefile and set the paths to where your VTK libraries and include files reside.
Change into the ../vtk2rib/src/ directory, edit the Makefile and set the paths to where your VTK libraries and include files reside. I need to consolidate this into Makefile.inc.
Finally, you can compile these branches.
cd vtk2rib/src
make
make check
make install
cd ../../src
make
make check
make install
cd ../shaders
make
make install
Now you'll need to setup your environment so that the installation paths are 1) visible for shader compiling 2) python modules are importable and 3) binaries are found in the execution path. Assuming you installed into /usr/local/svat you should add these lines depending on your shell:
# For BASH (~/.bashrc).
export SVATHOME=/usr/local/svat
export LD_LIBRARY_PATH=/usr/local/svat/lib:$LD_LIBRARY_PATH
export PYTHONPATH=/usr/local/svat/lib:$PYTHONPATH
export PATH=/usr/local/svat/bin:$PATH

# For CSH (~/.cshrc).
setenv SVATHOME /usr/local/svat
setenv LD_LIBRARY_PATH "/usr/local/svat/lib:${LD_LIBRARY_PATH}"
setenv PYTHONPATH "/usr/local/svat/lib:${PYTHONPATH}
setenv PATH "/usr/local/svat/bin:${PATH}"
-
DNA Research for their free 3Delight RenderMan tools for Linux and Windows.
-
GFDL for their scientific datasets.
-
SourceForge.net for hosting SVAT.
-
NASA for their satellite images.
-
The Blender developers for their free program.
-
RenderMan Academy - Some tutorials to get started with RenderMan.
-
RenderMan Repository - A wealth of tutorials and shaders for RenderMan. You can also find the "Advanced RenderMan" book's source code here.
-
rib-mode - For (X)Emacs, a syntax highliting, auto-indentation major mode for RIB files for the (X)Emacs text editor written by yours truly.
-
Scientific Visualization using Tools and Techniques from the Motion Picture Industry - A presentation describing SVAT given by yours truly at the 2007 Raytheon Software Symposium. Available in PowerPoint or PDF (15 MB). There are animations on slide 10 and 11, and probably only play on Windows.
Copyright © 2007-2008 Remik Ziemlinski
RenderMan® is a registered trademark of Pixar.